13Disciple | 10-Jan-19
Automatic Aim
Automatic aim or auto-aim, will automatically aim your gun at the center of an opposing tank, and move to keep it centered. It will not lead the target, and it will also continue aiming even when your target is behind cover. This mode is useful when engaging targets at close range while you are making complex maneuvers and it's more important to focus on driving than aiming. Auto aim will continue to aim on a target until it is not spotted or perishes. You can also disengage auto aim manually by pressing 'e' or right clicking again.
Lock On (Wheeled Vehicles):
This type of auto aim is exclusive to wheeled vehicles. This means you don't need to aim directly at an enemy vehicle's outline to turn on auto aim. It doesn't offer any other advantage other than this. It's helpful since the speed of these vehicles can make it really difficult to click the outline of an enemy while traveling at high speed over difficult terrain.
This type of auto aim is exclusive to wheeled vehicles. This means you don't need to aim directly at an enemy vehicle's outline to turn on auto aim. It doesn't offer any other advantage other than this. It's helpful since the speed of these vehicles can make it really difficult to click the outline of an enemy while traveling at high speed over difficult terrain.
Manual Aim
This is when you use your mouse to actually point your gun. It is often much better to manually aim, as you can then compensate for shell velocity, target lead, and also focus your aim on weak spots.
Arcade View:
This is the standard view you load into battle with. it's a 3rd person perspective from outside and above your tank. Your aim will follow your view point. This can be a little jarring at first especially when near obstacles as your elevated view point will cause your gun to point all the way up.
There will come a time when you want to look around with your mouse, and not move your gun from where it is aimed. You can do this by locking your gun in place. by default it is done by holding down right mouse button. Note that this is also the button that activates auto aim, so if you attempt to lock your turret while it is hovering over an enemy you may accidentally activate it.
Sniper View:
This provides a first person view that is through the gun. Note that the view is actually at the base of the gun, where it meets the turret. By default you can enter sniper view by pressing shift, or by scrolling (zooming) in all the way. Scrolling can also be used to magnify your view in sniper mode. The first person perspective of this view means you won't see the awkward gun movement that you sometimes see in arcade view.
Beware of tunnel vision in this mode. It's easy to get laser focused on a single target, especially in brawling scenarios. You lose knowledge of what is happening around. You could be getting flanked and have no idea. I suggest that during your reload cycle you either lock your turret, or auto aim, and then exit sniper view and observe how the battle is unfold. Once you are close to finishing your reload prepare to fire that next shot. If that is too much, it might be just as sufficient to check the mini-map during reload as well. this is faster, and gives you an overall view of how the battle is progressing. Even with out knowing and understanding how to read the mini-map, it's a good habit to start now, and you can begin to formulate your understand of battle flow before we touch on it later in the guide.
|
Strategic View:
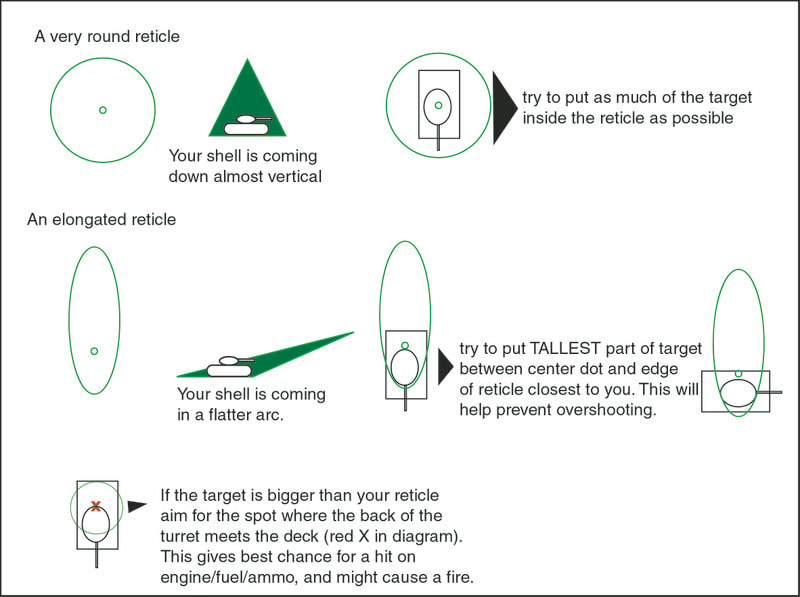
When you play self propelled guns (SPG), there is no sniper view. SPG's come equipeed with strategic view. It is accessed the same way as sniper view is accessed. This provides you with a top down view of the battlefield. You can mouse the cursor around, or you can hold control and click on the minimap to shift your view faster. In strategic view the reticle adjusts to the angle your shell in coming down on impact. The image here from the wiki can help you visualize why the aiming circle does this. While in strategic view, you can press 'g' and enter trajectory view. This offers an isometric view that shows you a sniper view at the angle of shell impact. This can be really useful to help you understand what obstacle is blocking your shots, or to help you thread fire between structures. Use both views to maximize your accuracy. Image Source - WoT Wiki |
Before we touch on accuracy, I recommend you watch this short video introduction that Wargaming put together.
Dispersion
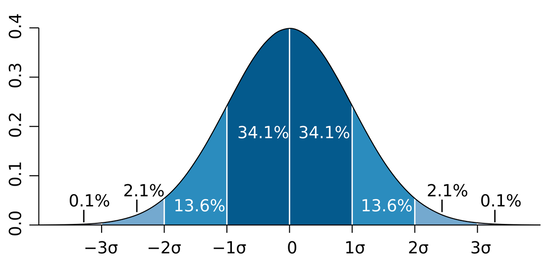
Your mouse controls the aiming of your vehicle. The dot at the center of the screen represents where you are aiming, and the circle around that dot represents your dispersion. Every time you fire in world of tanks, the shell is dispersed randomly with in this circle. However the random number generated (RNG) of your accuracy is actually based on a Gaussian (normal) distribution with a standard deviation of two sigma. This means that your shell is more likely to hit closer to center of your aim than at the edges.
|
You may notice that 4.2% of shots are going to fall outside the 2 sigma distribution curve. The game takes these values, and re-rolls the dispersion based on a flat distribution to place them with in the circle. Prior to update 0.8.6 these shots were placed on the edge of the dispersion.
This means ALL shots fired are 100% placed with in the dispersion circle. If you see a shell fall outside your dispersion circle you are either mistaken, or there is a discrepancy between your game client and the server. When you fire a shot your game client calculates the trajectory of the shell. It is then confirmed by the server and updated. In the rare instance of a large difference you may see a shells leave your barrel at an odd angle or possibly change path mid flight. |
Gun Accuracy
The game client provides accuracy as a dispersion value at 100 meters. The value describes 2 standard deviations from the center of your aim at that distance. If the client is saying your gun has an accuracy of 0.35 dispersion at 100m, then all of your shots at that distance will land with in 0.35m of the center of your aim. You can picture this as a cone from the base of your gun barrel that extends out linearly. This means that same gun will have a dispersion of 0.70m at 200 meters, and 1.4m at a range of 400 meters.
Aim Time
The aim time in the game client is described in seconds. This isn't how fast it takes to fully aim, this actually describes how quickly the reticle shrinks. The lower the number the better. It's the time it takes for the circle to shrink to 1/3 of it's size. Consumables like food, can lower the aim time, or crew skills like BiA can also lower it. There is also equipment such as gun laying drive that improves the speed, or vertical stabilizer, which makes the circle smaller to start with. Losing a gunner, damaging a gun, or getting stunned will all increase the aim time in game.
Note: We will touch on Gun Laying Drive vs Vertical Stabilizer in the equipment section later on.
Note: We will touch on Gun Laying Drive vs Vertical Stabilizer in the equipment section later on.
Shell Velocity
|
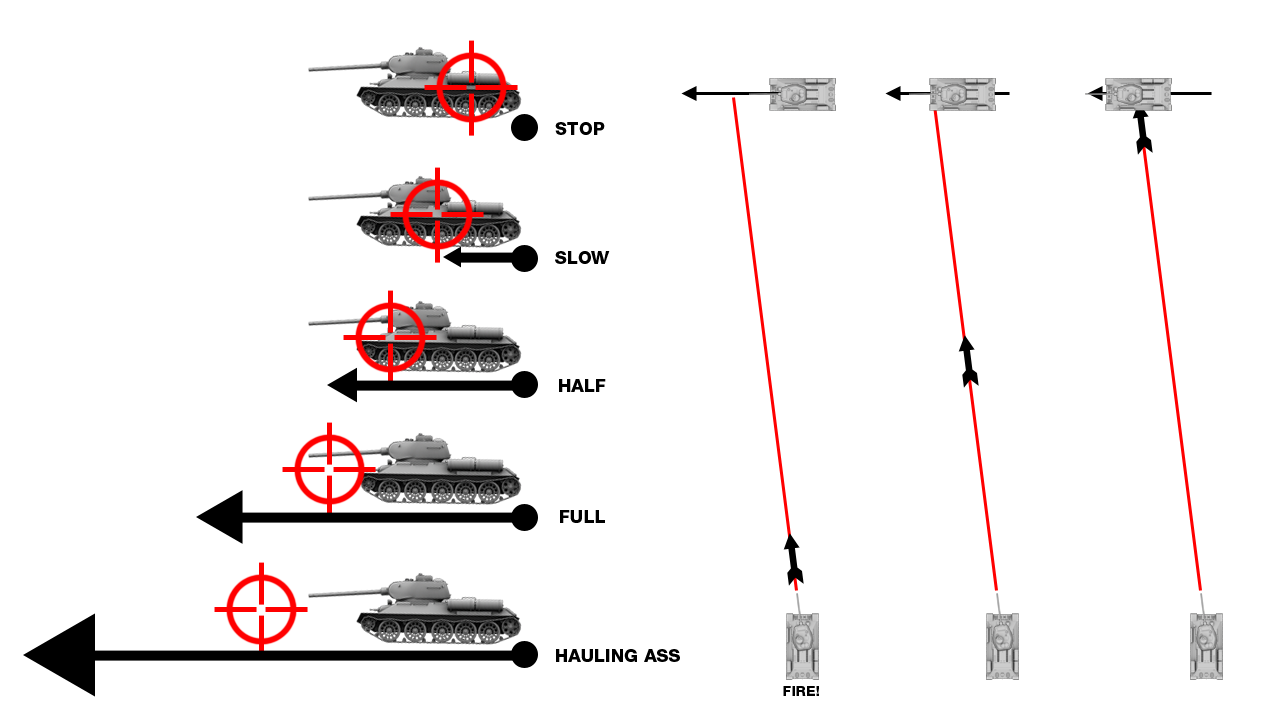
When you do fire a shell, it doesn't arrive at it's target destination instantly. It travels through it's trajectory at a set speed. The shell velocity is an attribute assigned to each ammo type for your gun. You can see this value in the garage or in game when you hover over the ammunition. This means that when you are attempting to hit a target that is moving you will need to lead that target. You'll need to lead it further for faster moving targets, and further more if you have low shell velocity. Selecting an ammunition type with high shell velocity can give you an easier time at leading targets at great distance, or speed, or both.
Image Source - Wot Wiki |
Ballistic Trajectory
Also note that the game does not ask you compensate for distance by aiming higher up. The game automatically adjusts your gun elevation up when shooting distant targets. This can however sometimes foul up your shots when you are aiming above a ridge line with a low velocity gun. The game will think you are trying to shoot something super far away since you are aim hovers above the horizon line (infinite distance), and it will try to compensate for that with a high elevation. Once you experience this in game you'll understand what I mean. You can combat this somewhat by trying to aim in arcade view above the tank.
Line of Sight
Shells follow a classic Newtonian trajectory however aiming is still line of sight. If you mouse over a target that you do have line of sight on, you'll see the enemy tank in a red outline. However you may end up in situations where you cannot place your reticle on targets, that you are still able to hit. Some low velocity shells such as howitzer guns have high arcs, meaning that even tho you cannot draw line of sight, you can still lob a shell over the obstacle or hill and hit an enemy tank. It's tricky but sometimes it can be accomplished in arcade view. Another scenario is when you are firing at a tank through destructible objects. AP and APCR rounds can penetrate destructible objects such as walls, fences, cars, etc.. and then go on to damage a target. You can guess the location of the tank and fire through the object in first person, or alternatively you can you use arcade view (and auto aim) to target an enemy on the opposite side of destructible cover.
Now that you've learned how to aim, it's time to learn where to aim.


