13Disciple | 30-Jan-19
Why did I wait until lesson 6 to talk about vision mechanics? Mainly because for tiers 1-4 it's far more important to understand the mechanics previously discussed than it is to understand vision. Once you begin to hit tier 4 and higher, it becomes extremely important to understand vision mechanics. Nothing has frustrated me more in this game than dying to ninja snipers, and not understanding how they did it. The Chieftain Teaches video below will give you a nice intro before we get into the details of vision mechanics. |
Heh.
|
Hide and Seek
Lets start with the basics. There are 2 values that determine whether you will spot a tank or not (described as spotting range). That is the view range (seeker) and the concealment value (hider). Yep! Only two values, and line of sight impact vision mechanics. The reason they are so difficult to grasp is because many factors can influence those two values. So the first goal is to know how those two values interact, and then we'll cover factors that influence them.
View Range:
The distance your vehicle's commander can spot an enemy tank. View range does not have a maximum value. The better your view range, the better your spotting range.
The distance your vehicle's commander can spot an enemy tank. View range does not have a maximum value. The better your view range, the better your spotting range.
|
Concealment:
The concealment value of a tank is displayed as a percentage. The percentage is displayed in the garage in 4 different factors. Concealment effectively reduces the maximum range at which you can be spotted. The equation for spotting range uses view range and concealment to determine whether a tank is spotted, or remains unseen. |

Concealment is split between moving / stationary, and firing / not firing.
|
Spotting Range:
The distance at which a tank is spotted, while in line of sight. The maximum range at which a vehicle can be spotted is 445 meters. The minimum distance is 50 meters - also known as proxy range. If you are with in 50 meters of a tank you will automatically spot them even with out line of sight. This minimum spot range is a cylinder centered around your tank with radius of 50 meters that extends above and below your tank. A tank can be 100 meters above you, but if they are with in your 50 meter radius, you will spot them. Remember line of sight is not required. Just as the Chieftain explained in his intro video, I like to think of proxy spotting as your crew hearing an idling enemy tank.
The spotting range is calculated with this equation:
spotRange = effViewRange - (effViewRange - 50) * camoValue
You will spot an enemy tank if that tank's distance to your vehicle is equal to or less than the spotRange, and you have line of sight. Or if that vehicle is with in the automatic spot range of 50 meters.
|
Draw Distance:
The maximum distance a spotted tank will be rendered on your screen. Draw distance is set to 564 meters and is the same for all tanks (except SPGs). Any spotted tank beyond this distance will show up on your mini map, but will not be rendered on your screen. You can shoot and damage tanks outside your draw distance even if you cannot see them rendered on your screen. |
|
Effective View Range
The effective view range (effViewRange) of your tank can be influenced by many factors. To determine your effective view range you take the base view range of the tank, or more accurately of the turret on your tank, and then modify it by crew skills, equipment and consumables.
Crew Skills
Crew Skills
- Commander's Major Qualification effective training level (up to 100%)
- Commander's Recon Skill (up to 2% additional view range)
- Radio Operators Situational Awareness (up to 3% additional view range)
- All Crew members 100% trained in Brothers in Arms (Improves the commander's major qualification effective training by 5%)
- Coated Optics (improves view range by 10%)
- Improved Optics (aka experimental optics - improves view range by 12.5%)
- Binocular Telescope (aka binos, improves view range by 25% after your vehicle is stationary for 3 seconds)
- Vents (improves the commander's major qualification effective training by 5%)
- Improved Ventilation (aka venting system - improves the commander's major qualification by 7.5%)
- Food consumable (improves the commander's major qualification by 10%)
- Directive Optical Calibration (improves view range by 2.5%)
- Directive vent purge (improves commander's major qualification by 2.5%)
|
All of the modifications that improve the commander's major qualification training level are additive.
IE: Vents and BiA will improve the commander's major qualification training by 10%. If the commander is already fully trained, then the effective training is 110%. All of the improvements that directly impact view range are also additive. IE: Coated optics with Situational awareness will improve your view range by a flat 13%. Keep in mind that often times the commander is also the radio operator. If your commander is also the radio operator, train Situational Awareness (radio operator) before Recon (commander), as this improves your view range more for the same exp. You can view your effective view range for any of your tanks directly in the garage. |

Stationary view range is the default display
|
Coated Optics with Binocular Telescopes:
If you equip both optics and binos to your tank, the effect is NOT additive. What happens is that when the tank is in motion it defaults to your base view range with coated optics. Once stationary and 3 seconds pass it switches from coated optics to binocular telescopes. If you begin moving again it switches back to coated optics. Basically when moving your base view range is improved by 10% from coated optics, and when stationary your view range is improved by 25% from binocs. If you have binocs equipped on your tank the base view range shown in the garage defaults to binocs up.
If you equip both optics and binos to your tank, the effect is NOT additive. What happens is that when the tank is in motion it defaults to your base view range with coated optics. Once stationary and 3 seconds pass it switches from coated optics to binocular telescopes. If you begin moving again it switches back to coated optics. Basically when moving your base view range is improved by 10% from coated optics, and when stationary your view range is improved by 25% from binocs. If you have binocs equipped on your tank the base view range shown in the garage defaults to binocs up.
Concealment
The concealment (camoValue) of your tank is influenced by many factors - equipment, consumables, skills, tank camouflage, whether you are moving or stationary, whether you are firing, and the environment on the map.
Crew Skills
Note: Wounded or stunned crew remembers do not effect concealment. When a vehicle is on fire it's concealment drops significantly.
Crew Skills
- Concealment skill (effective training level is averaged for all crew members. If two crew members in a 4 crew tank have concealment at 40% then it would work out to be (0+40+40+0)/4 = 20%)
- All Crew members trained 100% in Brothers in Arms (improves common skills such as repairs, and concealment by 5%).
- Camouflage Net (provides a percent bonus when the tanks hull is stationary for 3 seconds).
- Vents (improves the camo skill by 5%. Only works if at least 1 crew member is training concealment)
- Food Consumable (improves the camo skill by 10%. Only works if at least 1 crew member is training concealment)
- Crew Directive Natural Cover (provides all crew members with 100% concealment skill - adds 10% to vehicle concealment if the skill is already 100% trained)
Note: Wounded or stunned crew remembers do not effect concealment. When a vehicle is on fire it's concealment drops significantly.
Calculating the camoValue Factor:
camoValue = baseCamo * (0.00375 * camoSkill + 0.5) * shotPenalty + camoPattern + camoNet + enviCamo
baseCamo - Every vehicle has a base camo value assigned to it as part of game balancing. Generally tanks with smaller profiles have higher base camo values. The penalty from moving is in the table below.
camoSkill - This is your crew's effective skill level for the camouflage skill.
shotPenalty - This is another value defined by the developers as part of game balancing. The same gun can have different penalties for different vehicles. This value is 1 until a shot is fired. In update 0.9.1 the shotPenalty value was nerfed across the the board for TD's except for premium tanks. Since many premium tank destroyers were untouched by the 0.9.1 update, tanks such as the E25 are seen as over powered since their shotPenalty value is exceptionally low compared to most tech tree tanks. Typically the larger the caliber, the higher the camo penalty.
camoPattern - This is the camo bonus provided by painting your tank for gold, or rented for credits. You can access it via going to the exterior view in the garage. Note that 'painting' the tank does not provide the bonus. If a camo pattern type is applied to the same type of map you are playing on (summer, winter, desert) then you will receive the camoPattern bonus. This bonus is flat percent depending on tank type and must be applied to the hull. Camo does not need to be applied to the turret or the gun to receive the bonus.
camoNet - Provides a percent bonus to a vehicle that has been stationary for more than 3 seconds.
enviCamo - You can use different objects on the map to provide additional cover.
Hard Cover:
Solid objects like terrain, rocks, and buildings block line of sight completely, and will prevent being spotted unless otherwise proxy spotted. Some hard cover such as buildings are destructible.
Soft Cover:
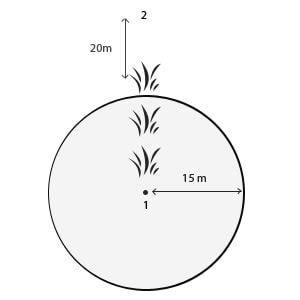
Objects that are semi transparent, but do not block direct fire such as bushes or trees (felled or not). They provide a camouflage bonus of up to 64% depending on the density of the object. As soon as you fire, the camo bonus provided by semi-transparent objects with in a 15m radius around your tank is reduced to 30% of it's original value. Objects further than 15m that are providing a camo bonus are not effected by your fire.
camoValue = baseCamo * (0.00375 * camoSkill + 0.5) * shotPenalty + camoPattern + camoNet + enviCamo
baseCamo - Every vehicle has a base camo value assigned to it as part of game balancing. Generally tanks with smaller profiles have higher base camo values. The penalty from moving is in the table below.
camoSkill - This is your crew's effective skill level for the camouflage skill.
shotPenalty - This is another value defined by the developers as part of game balancing. The same gun can have different penalties for different vehicles. This value is 1 until a shot is fired. In update 0.9.1 the shotPenalty value was nerfed across the the board for TD's except for premium tanks. Since many premium tank destroyers were untouched by the 0.9.1 update, tanks such as the E25 are seen as over powered since their shotPenalty value is exceptionally low compared to most tech tree tanks. Typically the larger the caliber, the higher the camo penalty.
camoPattern - This is the camo bonus provided by painting your tank for gold, or rented for credits. You can access it via going to the exterior view in the garage. Note that 'painting' the tank does not provide the bonus. If a camo pattern type is applied to the same type of map you are playing on (summer, winter, desert) then you will receive the camoPattern bonus. This bonus is flat percent depending on tank type and must be applied to the hull. Camo does not need to be applied to the turret or the gun to receive the bonus.
camoNet - Provides a percent bonus to a vehicle that has been stationary for more than 3 seconds.
enviCamo - You can use different objects on the map to provide additional cover.
Hard Cover:
Solid objects like terrain, rocks, and buildings block line of sight completely, and will prevent being spotted unless otherwise proxy spotted. Some hard cover such as buildings are destructible.
Soft Cover:
Objects that are semi transparent, but do not block direct fire such as bushes or trees (felled or not). They provide a camouflage bonus of up to 64% depending on the density of the object. As soon as you fire, the camo bonus provided by semi-transparent objects with in a 15m radius around your tank is reduced to 30% of it's original value. Objects further than 15m that are providing a camo bonus are not effected by your fire.
Vehicle Type |
Camo Net |
Style or Hull Camo |
Moving Penalty |
HT, SPG |
5% |
2% |
-50% |
MT |
10% |
3% |
-25% |
LT |
10% |
3% |
-0% |
TD |
15% |
4% |
-40% |
The table above is a generally true for all tanks. There are tanks that exist in the game that are exceptions to the values described in this table. For example the Valentine is a tier 4 British light tank that has a moving penalty to it's camouflage.
You can see your tank's raw camoValue with out any enviCamo in the garage.
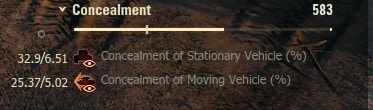
Concealment is split between moving / stationary, and firing / not firing.
Environmental Camouflage Continued:
In the illustration each bush is identical and provides a camo bonus of X. Since these bushes are between you (tank 1) and the line of sight from the enemy (tank 2), their camo bonus all stacks. this provides tank 1 with a camo bonus of 3X.
When you fire inside of cover, all of the soft cover around you is reduced to 30% of it's original bonus, and only the single highest camo value inside the 15m radius is used. If tank 1 fires from this location then their camo value would be reduced to 30% of a single bush, added to the one bush that is outside of the 15m radius which would bring your bonus down to 0.3X + X = 1.3X.
Camo bonus's are only reduced for the tank that fired. If you and another tank are sitting in the same bush, and your friendly fires, only their camo value will be reduced. However when enemies start shooting at him you could get hit by a near miss, or splashed by artillery. They may begin to blind fire that bush assuming he has returned which may also hit you. it's best to separate yourself from an ally that is attempting to share the same bush.
Pro Tip: Bushes that are with in 15m of your tank are transparent in sniper view. If a bush is solid in sniper view, it is outside your 15m radius.
|
If we assign these bushes to an environmental camo value of 10%, then we can calculate how they will add to the camo value above.
Not firing: enviCamo = 3 * 0.1 = 30% camo bonus provided by soft cover Firing: enviCamo = 0.3 * 0.1 + 0.1 = 13% camo bonus provided by soft cover The image provided is from the WoT Wiki. |
|
Concealment While Moving:
There is a penalty to the concealment of your tank while you are moving. This penalty is different by tank type (with some exceptions). You can see the breakdown of penalty by tank type in the above table. The following scenarios will give you the movement penalty to camo.
There is a penalty to the concealment of your tank while you are moving. This penalty is different by tank type (with some exceptions). You can see the breakdown of penalty by tank type in the above table. The following scenarios will give you the movement penalty to camo.
- Driving at any speed
- Falling or otherwise sliding (even if engine is 0 or you have the hand brake on)
- Getting bumped by an ally (even if engine is 0 or you have the hand brake on)
Putting it all together:
Normally I would run you through complicated math to help you understand the impacts of these on your camoValue. Instead I think it's faster and easier for you to experiment with how all of these impact the camo value of your tank on this calculator. You can even plug in a second tank and determine which vehicle will be spotted first! Big thanks to wotinfo.net for such a useful tool.
Normally I would run you through complicated math to help you understand the impacts of these on your camoValue. Instead I think it's faster and easier for you to experiment with how all of these impact the camo value of your tank on this calculator. You can even plug in a second tank and determine which vehicle will be spotted first! Big thanks to wotinfo.net for such a useful tool.
Spot Range
Once you have the above values figured out, determining spot range is a rather simple endeavor. If you have a tank with 445m view range, and you are looking for a stationary opposing enemy tank, that is sitting in the open with a camo value of 24.08% you can determine how close you need to be to spot them.
spotRange = 445 - (445 - 50) * 0.2408
spotRange = 350 meters
If we increase view range beyond the maximum spot distance to 490m:
spotRange = 490 - (490 - 50) * 0.2408
spotRange = 384 meters
Pro Tip: Having your view range beyond the maximum spot range is still useful for cutting through the camo values of highly camouflaged tanks!
Line of Sight
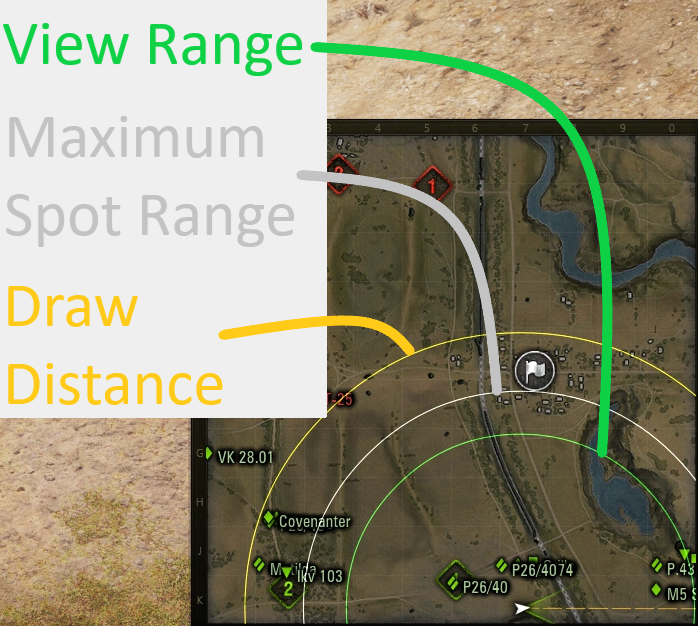
We've covered how to calculate spotting range, based on the view range and concealment. but in order to see an enemy tank you must have an unobstructed view of them. Every tank in the game has seven visibility checkpoints, and two view range ports. View range ports are the lines drawn from your vehicle to the visibility check points of opposing vehicles, and vice versa. This is how WoT checks for line of sight.
View range ports emit invisible vision rays. If these rays cross the visibility check points on the enemy vehicles, then you have line of sight. Spot range is then checked.
View range ports emit invisible vision rays. If these rays cross the visibility check points on the enemy vehicles, then you have line of sight. Spot range is then checked.
|
View Range Ports:
There is a single static view range port at the top of your tank that doesn't move (this is also the same location as the top visibility checkpoint). There is another dynamic view range port that is at the base of where the gun meets the turret that moves as you move your turret. The image provided is from the WoT Wiki. |

View Range Ports
|
|
Visibility Checkpoints:
Each tank has seven visibility checkpoints distributed across the outside of the vehicle's physics model. There is a check point at the center of the box roof. Two more are located at the front and back of the vehicle. Another two are at the sides. The sixth point is on the gun mantlet. and it is aligned with the seventh. Once the turret rotates one of these points moves with the mantlet, while the other remains in the same place. The image provided is from the Wot Wiki. |
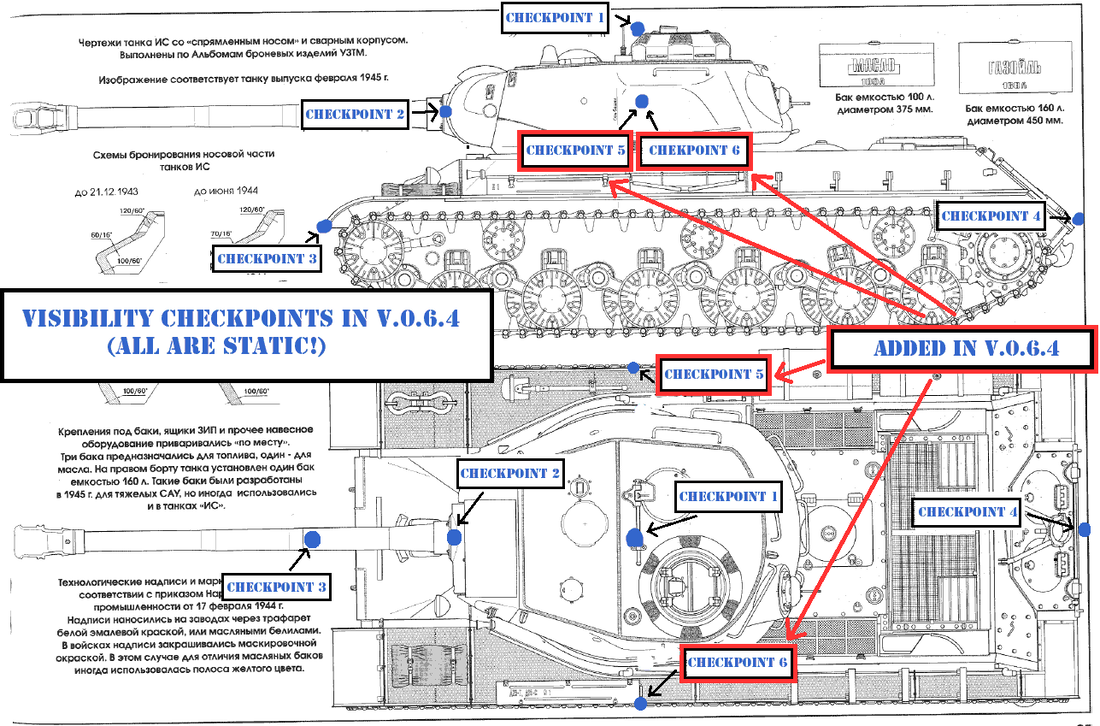
Visibility Checkpoints
|
Rate of Visibility Checks:
The rays that are drawn from view range ports to visibility check points are not constant. There is a rate of visibility checks that increases the closer you are to the tank you are trying to spot. There is debate as to the exact rates, as they have changed in patches, and may depend on maps and map sizes. Suffice it to say, the closer you are the higher the rate of checks. When a tank fires, a visibility check is immediately made.
The rays that are drawn from view range ports to visibility check points are not constant. There is a rate of visibility checks that increases the closer you are to the tank you are trying to spot. There is debate as to the exact rates, as they have changed in patches, and may depend on maps and map sizes. Suffice it to say, the closer you are the higher the rate of checks. When a tank fires, a visibility check is immediately made.
Spotting Duration
There is an ancient Wotlabs Forum post that did some in game checking on spotting duration. To summarize it a spotted target was lit for about 6 seconds. This duration was extended for maybe 3 or 4 seconds if the spotted tank fired. This duration was then further increased by the designated target perk, as long as the spotter was trained with the perk, was spotting for themselves, and aimed at the target.
There is still debate among the community on how long you stay lit after initially being spotted. It is generally at least 5 seconds and can go as long as 10 seconds. If you want to be unspotted or 'go dark' I recommend once you are out of line of sight, counting 10 seconds, or if you lit some one else at the same time, wait until they are dark.
There is still debate among the community on how long you stay lit after initially being spotted. It is generally at least 5 seconds and can go as long as 10 seconds. If you want to be unspotted or 'go dark' I recommend once you are out of line of sight, counting 10 seconds, or if you lit some one else at the same time, wait until they are dark.
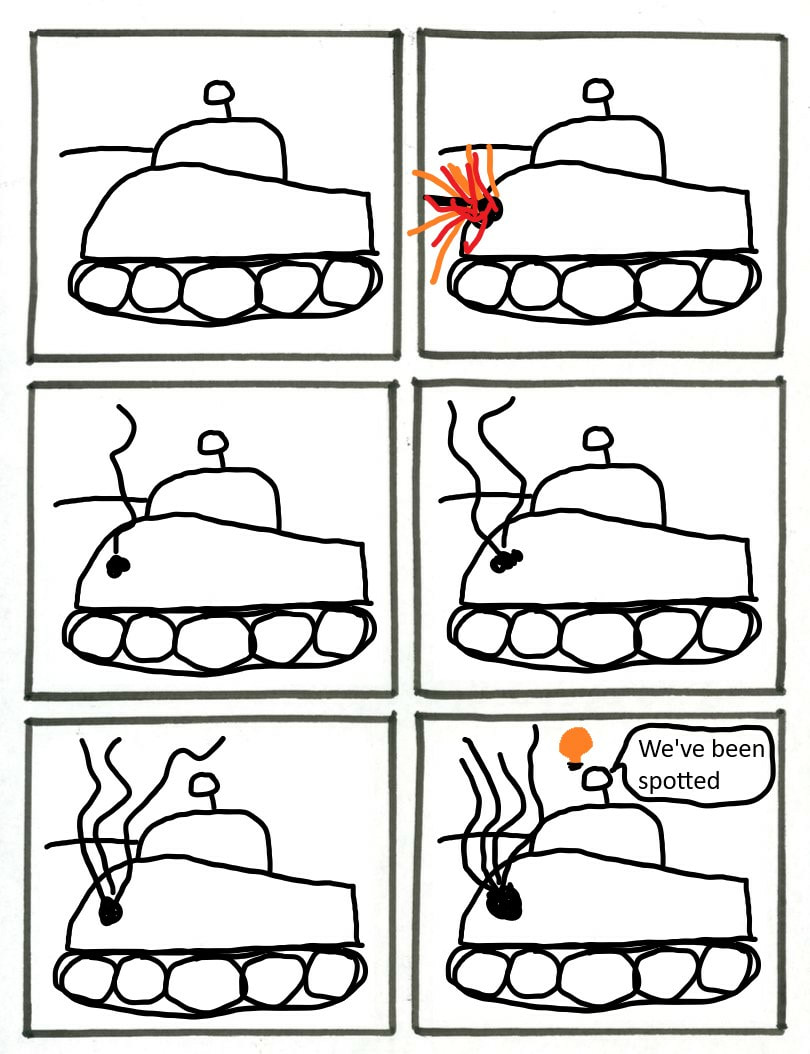
Sixth Sense
Sixth sense is a commander perk that comes into effect after it reaches 100% training. This perk will activate 3 seconds after you've been spotted. Many times you will take damage before the icon appears on your screen. For many new tankers, it can be really hard to play the game handicapped by not having sixth sense. A technique I've used is this: you can use the behavior of enemy tanks to determine if you are spotted, if their turret moves in your direction (especially after an enemy tank does a spotting run) it's a safe bet they can see you. Get to cover if you think you've been spotted. This is a good habit to get into because if you wait the 3 seconds for the icon to confirm your suspicions before getting into cover, you'll likely take hits.
"Damage is sixth sense for pubbies."
A bad player will wait until he takes damage, or for his sixth sense icon to let him know he's been spotted.
A good player will anticipate being spotted (as much as they can), and play accordingly. Only using the sixth sense icon as confirmation of what they already know.
Summing it all up, here are a couple videos provided by Wargaming. I put these last as I think it's better to read through the material, and then learn it again through a visual media. This should help solidify what we covered and help you retain all the information. Spotting mechanics are tough to grasp and it takes a while to understand the game mechanic. It's definitely worth your time to watch both. Some information is duplicated, but there is also information in each video that the other doesn't have. If you are new to this mechanic I suggest watching these again after a little while as a reminder and to relearn any parts you maybe forgot about.
|
|
|
Radio Range
It's worth covering radio range with spotting mechanics. When two friendly vehicles are in radio communication they share spotted tanks information for both friendly and foes. The radio range is the combination of both tanks. If your radio range is 350 meters and your allies radio range is 300 meters you will have a combined radio range of 650 meters. Radio range is only between two tanks. Tanks in between you will not relay information. If you are in communication with a friendly vehicle you will share the information about the position and health of all vehicles either of you are currently spotting.
- All friendly vehicles are in radio range if their distance to you is less than your combined radio ranges
- Any vehicles (friend and foe) spotted by you are relayed to all tanks in radio range
- Any vehicles (friend and foe) spotted by any ally is relayed to you if you are in radio range with them


